Contents
Remove U-Tip Hair Extensions?
Pre-bonded U-Tip hair extensions are a popular choice for adding length and volume, but there comes a time when you might want to remove them. Whether you’re looking to change up your style or just need a break, here’s a step-by-step guide to help you remove them safely and effectively.
Tools You’ll Need
- Keratin Bond Remover: This specialized solution is designed to break down the keratin adhesive that holds the extensions in place.
- Flat – Nose Pliers: These will be used to gently break the bond between the extension and your natural hair.
- Sectioning Clips: To keep your hair organized and make the removal process easier, sectioning clips are essential.
- Tail Comb: A tail comb is useful for separating your natural hair from the extensions and removing any remaining adhesive residue.
- Gentle Clarifying Shampoo and Conditioner: Needed to clean your hair after the extensions are removed and restore moisture.
How to Remove U-Tip hair extensions?
Section your hair
Start by parting your hair into small, manageable sections. Use sectioning clips to keep the rest of your hair out of the way as you work on one section at a time. This will make the removal process more efficient and reduce the risk of tangling.
Apply the keratin bond remover
Using an applicator, apply a small amount of the keratin bond remover directly to the u-shaped bond of the extension. Make sure to cover the bond thoroughly. Let the remover sit for 30 seconds to a minute. This will give it time to soften the keratin adhesive.

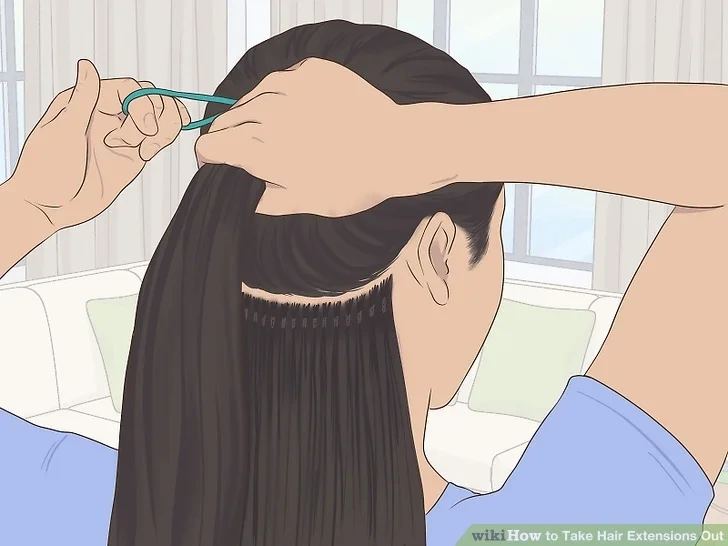
Break the bond
Take your flat-nose pliers and gently squeeze the softened bond. Apply gentle pressure to crack the bond apart. Be extremely careful not to pull or tug on your natural hair, as this can cause breakage. If the bond doesn’t break easily, apply a bit more remover and try again.
Slide the hair extension off
Once the bond is broken, the extension should slide off your natural hair with ease. If you feel any resistance, do not force it. Apply more bond remover and repeat the process with the pliers.


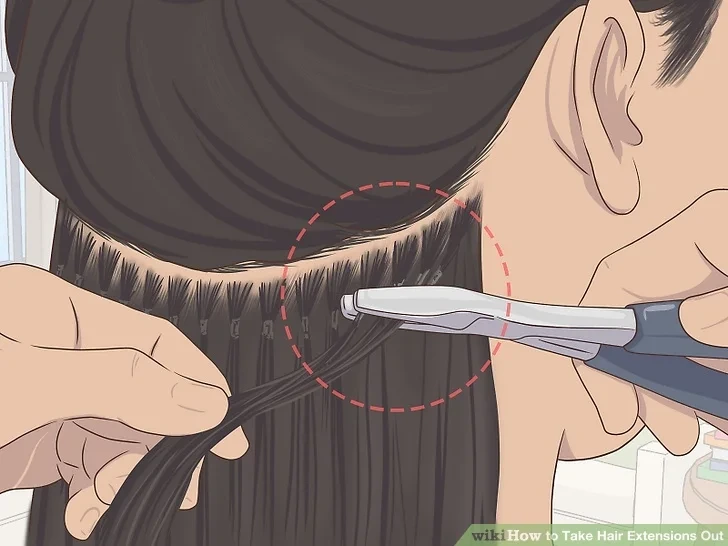
Remove residual adhesive
After removing U-Tip Hair Extensions, you may notice some leftover keratin adhesive in your natural hair. Use the tail comb to gently scrape away the residue. If there are stubborn pieces, apply a little more bond remover to dissolve them.
Wash and condition your hair
Once all the Pre-bonded U-Tip hair extensions are removed, wash your hair thoroughly with a gentle clarifying shampoo. This will remove any remaining bond remover and residue from your scalp and hair. Follow up with a moisturizing conditioner to nourish your hair, as the removal process can be a bit drying.

Essentials for Successfully Removing U-tip Hair Extensions
- Be Patient: Rushing the removal process can lead to hair damage. Take your time with each extension to ensure a clean and safe removal.
- Work in Small Sections: Focusing on small sections of hair at a time allows for more precision and reduces the risk of accidentally pulling on other parts of your hair.
- Use Professional – Grade Products: Investing in high – quality bond removers and tools designed specifically for u-tip extensions will make the process easier and safer.
Remember, if you’re unsure about removing U-Tip hair extensions on your own or if you encounter any difficulties, it’s always a good idea to seek the help of a professional hair stylist. They have the experience and expertise to ensure a damage – free removal.
If you have any questions about prebond hair extensions, please contact us and we will help you.
(blog)
blog,u tip hair extensions,u tip extensions,hair extensions utip,nail tip hair extensions,u tip human hair extensions,u tip,u tips,best u tip hair extensions,u tip fusion hair extensions,keratin u tip hair extensions,best u tip human hair extensions,utip human hair extensions,u tip hair extensions near me,u tip remy hair extensions